

Most of the web pages you encounter is presented to you via HTML,the world wide web’s
markup language. In this article, I will share with you 20 best practices that will lead to clean and
correct markup.
1. Always Declare a Doctype
1. Always Declare a Doctype
The doctype declaration should be the first thing in your HTML documents. The doctype
declaration tells the browser about the XHTML standards you will be using and helps it
read and render your markup correctly. I would recommend using the XHTML 1.0 strict doctype.
Some developers consider it a tough choice because this particular standard is less forgiving
than loose or transitional doctype declarations, but it also ensures that your code abides strictly
by the latest standards
<!DOCTYPE html PUBLIC "-//W3C//DTD XHTML 1.0 Strict//EN" "http://www.w3.
org/TR/xhtml1/DTD/xhtml1-strict.dtd">
2. Use Meaningful Title Tags
2. Use Meaningful Title Tags
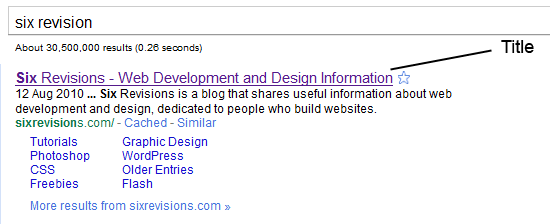
The <title> tag helps make a web page more meaningful and search-engine friendly. For example,
the text inside the <title> tag appears in Google’s search engine results page, as well as in the
user’s web browser bar and tabs. Take for instance, the following example:
<title>Six Revisions - Web Development and Design Information</title>
The example above appears like the following image in Google’s search engine results page:
3. Use Descriptive Meta Tags
Meta tags make your web page more meaningful for user agents like search engine spiders.
Description of Meta Attribute
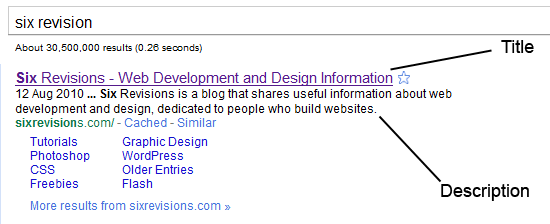
The description meta attribute describes the basic purpose of your web page (a summary of what
the web page contains). For each web page, you should place a consise and relevant summary
inside the meta description tag. For example, this description:
<meta name="description" content="Six Revisions is a blog that shares useful information about
web development and design, dedicated to people who build websites." /> Shows up in Google’s
search engine results page as follows:
Don’t try to spam your description with repeated words and phrases because search engines are
intelligent enough to detect that. Instead, just try to be simple and straightforward in explaining the
purpose of your web page.
Keywords Meta Attribute
<meta name="keywords" content="web design, web development" />
The keywords meta attribute contains a comma-separated list of key words and phrases that relate
to your web page. These keywords make your web page even more meaningful. Again, just like
with the description meta attribute, avoid repetition of words and phrases; just mention a few words
that aptly describes and categorizes your web page.
4. Use Divs to Divide Your Layout into Major Sections
Consider dividing your web page into major sections as the first step in constructing a website
design.
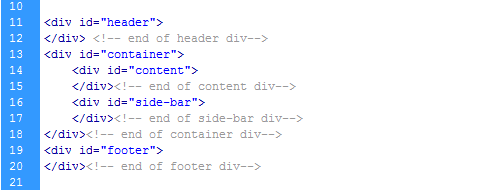
Doing so from the start promotes clean and well-indented code. It will also help you avoid confusion
and excess use of divs, especially if you are writing complex and lengthy markup.
5. Separate Content from Presentation
Your HTML is your content. CSS provides your content’s visual presentation. Never mix both. Don’t
use inline styles in your HTML. Always create a separate CSS file for your styles. This will help you
and future developers that might work on your code make changes to the design quicker and make
your content more easily digestible for user agents.
Bad Practice: Inline Styles
Below, you can see a paragraph element that is styled using the style attribute. It will work,
but it’s bad practice.
<p style="color:#abc; font-size:14px; font-family:arial,sans-serif;">
I hate to separate my content from presentation</p>
6. Minify and Unify CSS
A simple website usually has one main CSS file and possibly a few more for things like CSS reset
and browser-specific fixes. But each CSS file has to make an HTTP request, which slows down
website load times. A solution to this problem is to minify (take out unneeded characters such as
spaces, newlines, and tabs) all your code and try to unify files that can be combined into one file.
This will improve your website load times. A problem with this approach is that you have to
"unminiy" (because it’s hard to read unformatted code) and then redo the minification process
every time you need to update your code. So it’s better to do this at the end of your production cycle.
Online tools to minify and optimize CSS can be found on this list of CSS optimizers. Also, always
put your stylesheet reference link inside the <head></head> tags because it will help your web
page feel more responsive while loading.
7. Minify, Unify and Move Down JavaScript
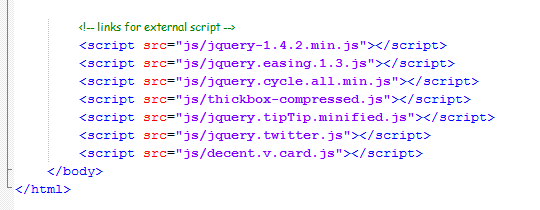
Like CSS, never use inline JavaScript and try to minify and unify your JavaScript libraries to reduce
the number of HTTP requests that need to be made in order to generate one of your web pages.
But unlike CSS, there is one really bad thing about external JavaScript files: browsers do not allow
parallel downloads, which means the browser cannot download anything while it’s downloading
JavaScript, resulting in making the page feel like it’s loading slowly. So, the best strategy here is
to load JavaScript last (i.e. after your CSS is loaded). To do this, place JavaScript at the bottom
of your HTML document where possible. Best practice recommends doing this right before the
closing <body>tag.
Example
8. Use Heading Elements Wisely
Learn to use <h1> to <h6> elements to denote your HTML’s content hierarchy. This helps make
your content more meaningful for screen-reading software and search engines, as well as other
user agents.
Example
<h1>This is the topmost heading</h1>
<h2>This is a sub-heading underneath the topmost heading.</h2>
<h3>This is a sub-heading underneath the h2 heading.</h3>
For blogs, I really recommend using the <h1> element for the blog post’s title instead of the
site’s name because this is the most important thing for search engines.
WordPress Code Example
<h1 class="entry-title"><?php the_title(); ?></h1>
9.Use the Right HTML Element at the Right Place
Learn about all the available HTML elements and use them correctly for a semantic and
meaningful content structure.
Use <em> for emphasis and <strong> for heavy emphasis, instead of <i> or <b>
(which are deprecated).
Example
<em>emphasized text</em>
<strong>strongly emphasized text</strong>
Use <p> for paragraphs. Don’t use <br /> to add a new line between paragraphs;
use CSS margin
and/or padding properties instead.
For a set of related elements, use:
- <ul> (unordered lists) when the order of the list items are not important
- <ol> (ordered lists) when the order of the list items are important
- <dl> (definition lists) for item/definition pairs
Don’t use <blockquote> for indentation purposes; use it when actually quoting text.
10. Don’t Use Divs for Everything
Sometimes developers end up wrapping <div> tags around multiple <div> tags that contain more
<div> tags, creating a mountain of divs. Under the latest draft of the W3C HTML specification, a
<div> is a meaningless element that should be used "as an element of last resort, for when no other
element is suitable." But many use it even for menial things like displaying inline elements as block
elements (instead of the display:block;CSS property). Avoid creating mountains of divs by using
them sparingly and responsibly.
11. Use an Unordered List (<ul>) for Navigation
Navigation is a very important aspect of a website design and the <ul> element combined with
CSS makes your navigation menus semantic (because, after all, a navigation menu is a list of links)
as well as beautiful. Also, by convention, an unordered list for your navigation menu has been
the accepted markup.
An Example of an Unordered List
<ul id="main_nav">
<li><a href="#" class="active">Home</a></li>
<li><a href="#">About</a></li>
<li><a href="#">Portfolio</a></li>
<li><a href="#">Services</a></li>
<li><a href="#">Blog</a></li>
<li><a href="#">Contact Us</a></li>
</ul>
CSS to Style the Unordered List into a Horizontal Navigation Bar
#main_nav { position:absolute; right:30px; top:40px;}
#main_nav li { float:left; margin-left:2px; }
#main_nav li a{ font-size:16px; color:#fff; text-decoration:
none; padding:8px 15px; -moz-border-radius:7px; -webkit-border- radius:
px; border-radius:7px;}
#main_nav li a.active,
#main_nav li a:hover{ background-color:#0b86cb; }
Output

12. Close Your Tags
Closing all your tags is a W3C specification. Some browsers may still render your pages correctly
(under Quirks mode), but not closing your tags is invalid under standards.
Example
<div id="test">
<img src="images/sample.jpg" alt="sample" />
<a href="#" title="test">test</a>
<p>some sample text </p>
</div>
13. Use Lower Case Markup
It is an industry-standard practice to keep your markup lower-cased. Capitalizing your markup will
work and will probably not affect how your web pages are rendered, but it does affect code
readability.
Bad Practice
<DIV>
<IMG SRC="images/sample.jpg" alt="sample"/>
<A HREF="#" TITLE="TEST">test</A>
<P>some sample text</P>
</DIV>
Good Practice
<div id="test">
<img src="images/sample.jpg" alt="sample" />
<a href="#" title="test">test</a>
<p>some sample text </p>
</div>
14. Use Alt Attributes with Images
Using a meaningful alt attribute with <img> elements is a must for writing valid and semantic code.
Bad Practice
<img id="logo" src="images/bgr_logo.png"/>
<!-- has an alt attribute, which will validate, but alt value is meaningless -->
<img id="logo" src="images/bgr_logo.png" alt="brg_logo.png" />
Good Practice
<img id="logo" src="images/bgr_logo.png" alt="Six Revisions Logo" />
15.Use Title Attributes with Links (When Needed)
Using a title attribute in your anchor elements will improve accessibility when used the right way.
It is important to understand that the title attribute should be used to increase the meaning of the
anchor
tag.
Bad Practice
<!-- Redundant title attribute -->
<a href="http://blog.com/all-articles" title="Click Here">Click here.</a>
When a screen reader reads the anchor tag, the listener has to listen to the same text twice.
What’s worse is that it doesn’t explain what the page being linked to is. If you are just repeating
the anchor’s text or aren’t intending to describe the page being linked, it’s better not to use a
title at all.
Good Practice
<a href="http://blog.com/all-articles" title="A list of all articles.">Click here.
</a>
16. Use Fieldset and Labels in Web Forms
Use the <label> element to label input fields. Divide input fields into logical sets using <fieldset>
Name a <fieldset>using <legend>. All of this will make your forms more understandable for users
and improve the quality of your code.
Example
<fieldset>
<legend>Personal Details</legend>
<label for="name">name</label><input type="text" id="name" name=
"name" />
<label for="email">email</label><input type="text" id="email" name=
"email" />
<label for="subject">subject</label><input type="text" id="subject"
name="subject" />
<label for="message" >message</label><textarea rows="10" cols="20"
id="message" name="message" ></textarea>
</fieldset>
17.Use Modular IE Fixes
You can use conditional comments to target Internet Explorer if you are having issues
with your web pages.
IE 7 Example
<!--[if IE 7]>
<link rel="stylesheet" href="css/ie-7.css" media="all">
<![endif]-->
IE 6 Example
<!--[if IE 6]>
<link rel="stylesheet" href="css/ie-6.css" media="all">
<script type="text/javascript" src="js/DD_belatedPNG_0.0.8a-min.js">
</script>
<script type="text/javascript">
DD_belatedPNG.fix('#logo');
</script>
<![endif]-->
However, try to make your fixes modular to future-proof your work such that when older versions of
IE don’t need to be supported anymore, you just have to update your site in one place (i.e. take out
the reference to the ie6.css stylesheet). By the way, for pixing PNG transparencies in IE6, I
recommend the DD_belated PNG script (the JavaScript method referenced above).
18.Validate Your Code
Validation should not be the end-all evaluation of good work versus bad work. Just because your
work validates doesn’t automatically mean it’s good code; and conversely, a work that doesn’t fully
validate doesn’t mean it’s bad (if you don’t believe me, try auto-validating Google or Yahoo!). But
auto-validation services such as the free W3C markup validation service can be a useful debugger
that helps you identify rendering errors. While writing HTML, make a habit to validate frequently;
this will save you from issues that are harder to pinpoint (or redo) once your work is completed
and lengthier.
19. Write Consistently Formatted Code
A cleanly written and well-indented code base shows your professionalism, as well as your
consideration for the other people that might need to work on your code. Write properly indented
clean markup from the start; it will increase your work’s readability.
20. Avoid Excessive Comments
While documenting your code, the purpose is to make it easier to understand, so commenting your
code logic is a good thing for programming languages like PHP, Java and C#. But markup is very
much self-explanatory and commenting every line of code does not make sense in HTML/XHTML.
Post a Comment
Note: Only a member of this blog may post a comment.